T-SQL, SQL Administration and SQL Server BI Articles Link List – May 2011

Here’s a quick wrap up of the articles published on SQLServerCurry.com in the month of May 2011

SQL Server Administration Articles

FileStream in SQL Server 2008 - In this article, we will see how to work with FileStream in SQL Server 2008 for storing unstructured data like documents and images on file system

SQL Server Monitoring Management Pack - Microsoft has released the SQL Server Management Pack for for Operations Manager 2007 SP1 and R2. This pack is used to discover SQL Server 2005, 2008, and 2008 R2 and monitors SQL Server components such as database engine instances, databases, SQL Server agents, jobs and other roles such as Reporting Services, Analysis Services, Integrations Services

Compressed Tables and Indexes in SQL Server 2008 - In this article, we will see how to use the new feature of compressing Tables and Indexes in SQL Server 2008 with some examples

SQL Server Migration Assistant v5.0 - Microsoft recently announced the release of SQL Server Migration Assistant (SSMA) v5.0, a tool to further simplify the user experience in automating the migration of Oracle, Sybase, MySQL and Microsoft Access databases to SQL server or SQL Azure

Troubleshoot Deadlocks using SQL Server Profiler 2005/2008 - In this article, we will see how to capture deadlocks while modifying data using SQL Server Profiler in SQL Server 2005/2008

SQL Server: Calculate tempdb Space using DMV - I am a huge fan of Dynamic Management Views (DMV) as they provide me the ability to look into the internals of SQL Server. I have been writing regularly about the same. Here are some of the articles

DDL Triggers in SQL Server 2005 and 2008 - In this post, we will see how to implement DDL triggers in SQL Server 2005 and 2008. 

T-SQL Articles

FileStream in SQL Server 2008 - In this article, we will see how to work with FileStream in SQL Server 2008 for storing unstructured data like documents and images on file system

how to use FLWOR Expression designed for querying XML data in SQL Server 2005 and 2008.

SQL Queries – beyond TRUE and FALSE - Most of the SQL novices are more accustomed to thinking in terms of two-valued logic (TRUE, FALSE) in SQL. But SQL uses three-valued logic – TRUE, FALSE and UNKNOWN. It means that the value of an expression may be TRUE, FALSE or UNKNOWN. Confused?

SQL CLR Stored Procedure using Visual Studio 2010 - In this post, we will see how to use SQL CLR functionality for defining Stored Procedure using C# in VS 2010. We will also see how to enable CLR under SQL Server

Troubleshoot Deadlocks using SQL Server Profiler 2005/2008 - In this article, we will see how to capture deadlocks while modifying data using SQL Server Profiler in SQL Server 2005/2008

SQL Server–Error Handling using Try Catch Block - In this post, we will see how to handle errors in SQL Server 2005 and 2008. In SQL Server 2005, Microsoft has introduced a new construct to handle errors in SQL Server that is ‘TRY – CATCH’. It is similar to .NET ‘Try – Catch’ block for handling the exceptions

SQL Server CLR User Defined Function using Visual Studio 2010 - In this post, we will see how to create a User Defined Function using Visual Studio 2010

SQL BI Articles

SSRS 2008: Cascading Parameterized Report - In this article, we will see how to create a SSRS 2008 report with cascading parameters. We will create cascading parameters and add those to our report. For this demonstration, we will use SQL Server 2008 database ‘AdventureWorks’ for designing the report as well as parameters.

DDL Triggers in SQL Server 2005 and 2008

In this post, we will see how to implement DDL triggers in SQL Server 2005 and 2008. 

In SQL Server 2005, Microsoft introduced DDL triggers that fire in response to Data Definition Language (DDL) statements and can be implemented for various operations such as auditing in SQL Server.

DDL triggers can be fired for the following statements –
  1. CREATE.
  2. ALTER.
  3. DROP.
  4. Other DDL statements.
For a complete list for DDL events, click on the following link – http://technet.microsoft.com/en-us/library/bb522542.aspx

Now let’s start implementing some DDL triggers by using T-SQL. Open SQL Server Management Studio and connect to the Northwind database –
SQL Server DDL Trigger
When you execute the drop table command, you will encounter the user defined message shown above.

Let’s drop the trigger for the time being –

DROP TRIGGER NoDropTables ON DATABASE

Now let’s write a trigger which will disallow all the DDL operations, as shown below –

CREATE TRIGGER NoDDLEventsOnDatabase
ON DATABASE FOR DDL_DATABASE_LEVEL_EVENTS
AS
BEGIN
    PRINT 'You are not allowed to Perform DDL Commands on this Dattabase'
    ROLLBACK
END


Try and perform a CREATE, ALTER or DROP statement. The statement will be rollback.

We will now audit the database. For auditing database level trigger, we have a very special function called
‘EVENTDATA()’. Let’s alter the trigger we created above to see the audit data –

ALTER TRIGGER NoDDLEventsOnDatabase
ON DATABASE FOR DDL_DATABASE_LEVEL_EVENTS
AS
BEGIN
    DECLARE @AuditData XML
    SET @AuditData=EVENTDATA()
END


Try to drop the table and see the data returned by ‘EVENTDATA()’ –

SQL Server DDL Trigger
The above XML is returned by the ‘EVENTDATA()’ function. Now let’s insert this data in a table so that we can design a report with all this data, at the end of the day –

Design the table first as shown below –

SQL Server DDL Trigger

Now let’s alter a trigger as shown below –

ALTER TRIGGER NoDDLEventsOnDatabase
ON DATABASE FOR DDL_DATABASE_LEVEL_EVENTS
AS
BEGIN
    DECLARE @AuditData XML
    SET @AuditData=EVENTDATA()
    INSERT INTO AuditDLLStatements VALUES
    (GETDATE(),CONVERT(NVARCHAR(50),@AuditData.query('data(//ServerName)')),CONVERT(NVARCHAR(50),@AuditData.query('data(//LoginName)')),CONVERT(NVARCHAR(50),@AuditData.query('data(//EventType)')),CONVERT(NVARCHAR(1000),@AuditData.query('data(//TSQLCommand)')))
END


and that’s it! You may also want to read Display DDL Triggers in your SQL Server Database

SQL Server: Calculate tempdb Space using DMV

I am a huge fan of Dynamic Management Views (DMV) as they provide me the ability to look into the internals of SQL Server. I have been writing regularly about the same. Here are some of the articles

List Dynamic Management Views (DMV) by Category in SQL Server 2008
Monitor Running Processes in SQL Server 2005/2008 (written by Madhivanan)
SQL Server: Identify Memory and Performance Issues in T-SQL Queries and Fix them (written by Madhivanan)
Find the Most Used Stored Procedures in SQL Server
Dynamic Management Views (DMV) for SQL Server Performance and Tuning
Important DMVs to monitor CPU – SQL Server

In this article, we will see how to calculate total and free space in tempdb using the sys.dm_db_file_space_usage DMV, which returns space usage information for each file in the database. tempdb is an important object in SQL Server as all databases utilize its resources. Thus it becomes important to monitor tempdb’s space usage.
Here’s the query to find the Total tempdb Size and Free space
TempDB size DMV

SELECT
SUM(unallocated_extent_page_count
+ user_object_reserved_page_count
+ internal_object_reserved_page_count
+ mixed_extent_page_count
+ version_store_reserved_page_count) * (8.0/1024.0)
AS [TotalTempDBSizeInMB]
, SUM(unallocated_extent_page_count * (8.0/1024.0))
AS [FreeTempDBSpaceInMB]
FROM sys.dm_db_file_space_usage


In the query above, we are doing a sum of columns across all tempdb files. The result is multiplied by 8 as page count values will always be a multiple of eight. The division by 1024 is to calculate the size in MB’s.

OUTPUT

image

SQL Server CLR User Defined Function using Visual Studio 2010

In this post, we will see how to create a User Defined Function using Visual Studio 2010. In my previous article ‘SQL CLR Stored Procedure using Visual Studio 2010’, we have seen how to create a Stored Procedure using C# language with Visual studio 2010. Initial few steps are common for this article like –

1) Enabling CLR using SQL Server Management Studio.
2) Setting connection properties after creating Visual Studio project.
3) Setting security if you are implementing the functionalities like File IO operations or calling Win 32 APIs.

Please follow the steps for enabling CLR under SQL Server as specified in my previous article.

Now let’s create a ‘Visual C# SQL CLR Database Project’ with the name ‘SampleCLRUDF’ as shown below –

SQL Server CLR

Once you create the project, it will ask you for a connection. If you already have created a connection, use the same or create a new connection to the database of your choice. I already have an existing connection to the database ‘SALCLRSampleDB’ database. I will choose the same.

Now let’s add a ‘User Defined Function’ to our project with the name ‘CheckEMailUDF’ as shown below –

SQL Server UDF

Write some code which will take ‘Email’ address as parameter and will return true or false value depending upon the validation. To do so, first import a namespace ‘using System.Text.RegularExpressions;’ in our function. Now write code to validate the email address as shown below –

[Microsoft.SqlServer.Server.SqlFunction]
public static bool CheckEMailUDF(string EMailID)
{
   return Regex.IsMatch(EMailID, @"\w+([-+.']\w+)*@\w+([-.]\w+)*\.\w+([-.]\w+)*");
}


Now let’s deploy the project. Right click the project and click on ‘Deploy’ menu. Once the deployment is completed, test whether the deployment is successful or not in the ‘Object Explorer’ of SQL Server Management Studio as shown below –

SSMS Object Explorer

Let’s execute the function and observe the result as shown below –

USE SQLCLRSampleDB
GO

SELECT dbo.CheckEMailUDF('dabade.pravin')
SELECT dbo.CheckEMailUDF(‘youremailaddresshere@gmail.com')

The result of both select statements is shown below  –

clip_image001

SQL Server Denali: Analysis Services Roadmap update

If you are a SQL Server BI developers and are amongst the folks eagerly awaiting the release, news and roadmap update on SQL Server Denali Analysis Services, then I would strongly recommend you to read this post by T.K Anand, the Principal Group Program Manager of the SQL Server Analysis Team.

In his post Analysis Services – Vision & Roadmap Update, Anand has provided an update on the SQL Server Analysis Services roadmap released in November 2010 last year. The Business Intelligence Semantic Model is being introduced in Analysis Services for SQL Server “Denali” to build on the strengths and success of Analysis Services, expand its reach to a much broader community, and enable the next generation of BI applications.

Anand quotes “The BI Semantic Model is one model for all end user experiences – reporting, analytics, scorecards, dashboards, and custom applications.  All client tools in the Microsoft BI stack – Excel, PowerPivot, SharePoint Insights and Reporting Services (including Crescent) – operate on this model

To be notified of the next Denali CTP launch, check here http://www.sqlserverlaunch.com/

SQL Server–Error Handling using Try Catch Block

In this post, we will see how to handle errors in SQL Server 2005 and 2008. In SQL Server 2005, Microsoft has introduced a new construct to handle errors in SQL Server that is ‘TRY – CATCH’. It is similar to .NET ‘Try – Catch’ block for handling the exceptions. When an error is caught in a T-SQL statement which is inside the ‘TRY’ block, the control is automatically transferred to the ‘CATCH’ block.
We can then process the error in the ‘CATCH’ block.

So let’s see some examples of the TRY CATCH block for handling the errors in SQL Server. First let’s create two tables with a relationship between them as shown below –

sqlserver-try-catch-tables

Now let’s insert three records in ‘SampleCustomers’ table as shown below –

sqlserver-try-catch-table1

Insert few records in ‘SampleOrders’ table as a transaction, as shown below –

sqlserver-try-catch-transaction

Now select the records from both the tables as shown below –

image

If you observe, we are using ‘XACT_ABORT ON’ statement before starting the transaction. Because of this statement set to ‘ON’, if the T-SQL statement raise the error, the entire transaction will be roll backed. So in the data above, data for ‘SampleOrders’ did not get inserted.

Now let’s try the same transaction by setting the ‘XACT_ABORT’ statement to ‘OFF’. The transaction will roll back the statements which has errors, but the other statements will get committed as shown in the following output –

XACT-abort statement

SET XACT_ABORT OFF
BEGIN TRY
    BEGIN TRAN
        INSERT INTO SampleOrders VALUES(100,GETDATE()-1,GETDATE()+5,1)
        INSERT INTO SampleOrders VALUES(101,GETDATE()-1,GETDATE()+5,4)
        INSERT INTO SampleOrders VALUES(102,GETDATE()-1,GETDATE()+5,2)
    COMMIT TRAN
END TRY
BEGIN CATCH
    SELECT
        ERROR_NUMBER() AS ErrorNumber,
        ERROR_SEVERITY() AS ErrorSeverity,
        ERROR_STATE() as ErrorState,
        ERROR_PROCEDURE() as ErrorProcedure,
        ERROR_LINE() as ErrorLine,
        ERROR_MESSAGE() as ErrorMessage;
        ROLLBACK
END CATCH


Now if you execute the above transaction which uses the ‘TRY-CATCH’ block, when an error occurs in a T-SQL statement, it moves the control from ‘TRY’ block to ‘CATCH’ block where we are rolling back the complete transaction. The output will show the error information by using couple of in-build error functions as shown below –

clip_image002

Now let’s write a stored procedure which will raise an error and we will capture the user defined error by using ‘TRY-CATCH’ block. The scenario is, if the total amount of order no. is not exceeding 500, the order will not be processed now.

sqlserver-try-catch-demo

Now let’s execute the stored procedure and check the output of the procedure as shown below –

EXEC CheckOrderTotalAmt 10248


clip_image001

Troubleshoot Deadlocks using SQL Server Profiler 2005/2008

In this article, we will see how to capture deadlocks while modifying data using SQL Server Profiler in SQL Server 2005/2008.

What are Deadlocks? Deadlocks occur when two processes are holding an exclusive lock by mutually blocking each other. It can also occur if the same rows in the same table are accessed in a different sequence by two processors.

When a deadlock is detected by SQL Server, it will choose one of the processes as a ‘Victim’, abort and rollback the process. Deadlocks can be reduced by designing the applications carefully and by following good indexing practices. The best way to prevent a deadlock is to keep the transactions as short as possible. SQL Server allows you to save deadlock graphs in XML. SQL Server profiler will allow you to read the deadlock XML file and display it graphically.

So let’s see the how to use the SQL Profiler. Let’s start by opening a SQL Profiler. To open the SQL Profiler, go to SQL Server 2008 > Performance Tools > SQL Server Profiler as shown below –

SQL Server Profiler

Once you open the profiler, it will ask you to connect to the server. Click on ‘New Trace’ button and Connect to your SQL Server instance as shown below –

Connect SQL

Once you connect to the server, you will see the ‘Trace Properties’ window. In the first tab ‘General’, call the Trace name as ‘CheckDeadlocks’. Then choose a template ‘Blank’. Check the checkbox ‘Save to File’ and save the file in a preferred location. I am saving it in the ‘Documents’ folder as shown below –

SQL Server Trace Properties

Now let’s click on the ‘Event Selection’ tab and expand the ‘Locks’ category. Choose the following events –
  1. Deadlock Graph
  2. Lock: Deadlock Chain
Now expand the ‘Stored Procedure’ Category and choose the following events –
  1. RPC: Starting
  2. SP: Stmt Starting
  3. SP: Stmt Completed
  4. RPC: Completed
Now let’s scroll to the right to find the ‘DatabaseID’ column. Right click the column and click on ‘Edit Column Filters’ as shown below –

SQL Trace Properties

Expand the ‘Not Equal To’ node and type ‘4’ number as shown below –

Edit Trace Filter

Click the ‘OK’ button. This will filter out all the activities in ‘msdb’ database. Now click on ‘Events Extraction Settings’ tab and check the checkbox ‘Save Deadlock XML events separately’ and save the file in a preferred location. The file will be saved with the extension ‘.xdl’. Name the file ‘DeadlockXMLEvents’. Now choose ‘Each Deadlock XML batch in a distinct file’ option and click on the ‘Run’ button.

Now let’s open SQL Server Management Studio and write a new query. Write the following query which will create two tables in our Northwind Database –

Northwind Tables

Once your tables are created, let’s open a New Query window and write the following transaction statement –

TRANSACTION 1

USE Northwind
GO

BEGIN TRAN
    --First Query
    UPDATE CopyCustomer SET ContactTitle='Owner' WHERE
    CustomerID='ALFKI'
   
    --Second Query
    UPDATE CopyOrders SET OrderDate=GETDATE() WHERE
    CustomerID='ALFKI'


Now let’s create another Query Window and start a new transaction statement as shown below –

TRANSACTION 2

USE Northwind
GO

BEGIN TRAN
    --First Query
    UPDATE CopyOrders SET OrderDate=GETDATE() WHERE
    CustomerID='ANATR'
   
    --Second Query
    UPDATE CopyCustomer SET ContactTitle='Sales Representative'
    WHERE CustomerID='ANATR'


If you observe TRANSACTION 1 statement, the T-SQL code is trying to change the contact title of customer ‘ALFKI’. Similarly in TRANSACTION 2, the query (written in a new query window) is trying to change the OrderDate of customer ‘ANATR’.

Let’s execute TRANSACTION 1 (first query) and then execute the TRANSACTION 2 (first query) respectively. Go back to TRANSACTION 1 and execute the second query which is trying to update Orderdate of customer ‘ALFKI’ and observe what happens! This query will not get executed.

Now go back to TRANSACTION 2 and execute he second query which is updating ContactTitle of customer ‘ANATR’ and see what happens! This query will get executed after some time. But how did this happen! Let’s go back to the first transaction query windows and observe the message. The message is as follows –

SQL Server Deadlock

This above scenario is a ‘TRUE DEADLOCK’. If you observe TRANSACTION 1 ,  has become a deadlock victim and got roll back. Now let’s go back to our SQL Server Profiler and see the graphical view of this deadlock. Click on the ‘Stop’ button.

Go to the path where we have saved the ‘.xdl’ file and open that file. It will look similar to the following (image divided in two screenshots) –

SQL Server Deadlock
SQL Server Deadlock

On the same topic, make sure you read these posts too:

Monitor Running Processes in SQL Server 2005/2008
SQL Server: Identify Memory and Performance Issues in T-SQL Queries and Fix them

SQL Server Migration Assistant v5.0

Microsoft recently announced the release of SQL Server Migration Assistant (SSMA) v5.0, a tool to further simplify the user experience in automating the migration of Oracle, Sybase, MySQL and Microsoft Access databases to SQL server or SQL Azure.

The new features in v5.0 include:
  • Support for migrating to SQL Server “Denali”
  • Multi-thread data migration for improved scale and performance.
  • Globalization support for migrating non-English databases to SQL Server.
  • Support for installation for SSMA Extension Pack on clustered SQL Server environments.
  • Sybase Migration Enhancements

SQL CLR Stored Procedure using Visual Studio 2010

In this post, we will see how to use SQL CLR functionality for defining Stored Procedure using C# in VS 2010. We will also see how to enable CLR under SQL Server.

T-SQL is designed for direct access of data and for manipulation of that data. But T-SQL does not contain arrays, classes, collections, For-Each loop functionalities. However using SQL CLR, we can achieve all of this. With the integration of CLR in SQL Server, we can write managed code to define –
  1. Stored Procedures.
  2. User Defined Functions.
  3. Triggers.
  4. User Defined Type.
  5. User Defined Aggregate.
The decision to use CLR functionality under SQL server needs to be implemented when you are performing –
  1. CPU intensive operations.
  2. Procedures that perform complex logic.
  3. When you want to use BCL (Base class libraries) of .NET framework.
By default the CLR is not enabled under SQL Server. To enable CLR under SQL Server, execute the following command –

SP_CONFIGURE 'clr enabled',1
RECONFIGURE

You will see the following result –

SQL CLR Enable

Once you enable the CLR, now let’s create a Stored Procedure using Visual Studio 2010 –

CLR Stored Proc VS 2010

This will display a ‘New Database Reference’ window where we will have to provide a database connection. Let’s set the configuration as shown below –

New Database Reference

If the database is not available, it will get created or you can choose an existing database if you want. After this step, this will ask you whether you want to enable SQL/CLR debugging. Click the ‘YES’ button.

Important Note – Right click your project and go to properties window. Make sure that you have selected the framework - .NET 3.5. Now observe the project under solution explorer. It contains a Test.sql file to test the procedure or function. It also contains PostDeployScript.sql file and PreDeployScript.sql file as shown below –

Post Pre Deploy Script

Post and Pre deployment scripts can be used for modifying, dropping or recreating and taking other actions before or after deployment. Now let’s add a Stored Procedure in our project. Right click the project and add Stored Procedure with the name ‘FileIOOperation’.

Now import a namespace for the I/O operation –

using System.IO;

Write code for creating a file and writing a message in the file as shown below –

File IO Operation

Now let’s deploy the procedure. Right click the project and click ‘Deploy’ from the context menu. Once deployment succeeds, go to SQL Server Management Studio and confirm the deployment. Go to ‘Object Explorer’ > Expand the ‘SQLCLRSampleDB’ > under ‘Programmability’ > ‘Assemblies’ folder you will see our assembly and under ‘Stored Procedures’ folder you will see the stored procedure as shown below –

clip_image001

Let’s try to execute the stored procedure by writing the following code –

image

If you execute the stored procedure, you will get a security exception as shown below –

CLR Security Exception

The reason for this exception is this stored procedure will only run under database scope and will not allow you to perform the IO operations. There are three permission sets which are available with CLR objects as explained below –

1) SAFE – this permission will allow you to perform computation and data access operations within the server. This is the default permission.
2) EXTERNAL_ACCESS – this permission will allow you to access the external resources like files, network, registry, environment variables etc.
3) UNSAFE – this permission will allow you to access restricted resources like WIN 32 APIs.
So for our demo, let’s set the permission to ‘EXTERNAL_ACCESS’. Right click our project and go to properties window. From the properties window, chose ‘Database’ option and set the ‘Permission Level’ to ‘External’ as shown below –

SQL Permission Level

Now redeploy the project. The deployment will fail because our database is not set to ‘TRUSTWORTHY’ flag. So let’s set the ‘TRUSTWORTHY’ flag to ‘ON’ as shown below –

ALTER DATABASE SQLCLRSampleDB SET TRUSTWORTHY ON

Now again redeploy the project this time the deployment will be successful.

Now test our stored procedure by executing it. Check on your ‘C:\’ the file is created with the name ‘Test.txt’. Open it and see the message as shown below –

clip_image004[6]

Download the source code

SQL Queries – beyond TRUE and FALSE

Most of the SQL novices are more accustomed to thinking in terms of two-valued logic (TRUE, FALSE) in SQL. But SQL uses three-valued logic – TRUE, FALSE and UNKNOWN. It means that the value of an expression may be TRUE, FALSE or UNKNOWN. Confused?

I guess nothing much needs to be explained about TRUE & FALSE. Let’s focus on UNKNOWN. In one line: SQL uses NULL for missing values and when the logical expression involves a missing value, it evaluates to UNKNOWN. Simple!! So what is so important about it?

Accept TRUE and Reject FALSE

In a two-valued logic system, Accept TRUE  is same as Reject FALSE. But in SQL, both are different.

Accepts TRUE = Reject both FALSE and UNKNOWN
Rejects FALSE = Accepts both TRUE and UNKNOWN

SQL query filters (e.g. Where) “Accept TRUE”. That means if the expression is “True”, only then will it be included, otherwise dropped from the result collection.

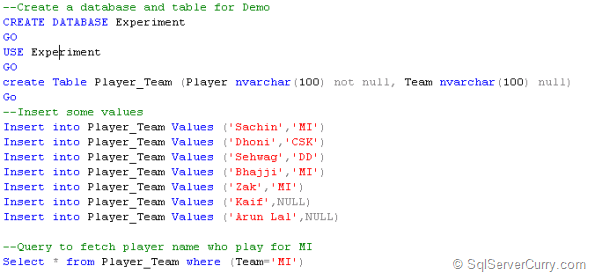
Let’s demonstrate this behavior with an example. We will create a table which will have 2 columns – Player and Team. Then we will filter out the players who play for team ‘MI’.

sql-demo_query

Here’s the query for you to try out

--Create a database and table for Demo
CREATE DATABASE Experiment
GO
USE Experiment
GO
create Table Player_Team (
Player nvarchar(100) not null,
Team nvarchar(100) null)
Go
--Insert some values
Insert into Player_Team Values ('Sachin','MI')
Insert into Player_Team Values ('Dhoni','CSK')
Insert into Player_Team Values ('Sehwag','DD')
Insert into Player_Team Values ('Bhajji','MI')
Insert into Player_Team Values ('Zak','MI')
Insert into Player_Team Values ('Kaif',NULL)
Insert into Player_Team Values ('Arun Lal',NULL)
--Query to fetch player name who play for MI
Select * from Player_Team where (Team='MI')

The output of above Select query will be:

sql-demo_query2

Only three players have Team Values as MI. And condition (Team='MI') is true for them. For ‘Kaif’ and ‘Arun Lal’, the team value is NULL, which will be evaluated as UNKNOWN. As said earlier, SQL query filter accepts true (= reject False and UNKNOWN) hence only 3 rows.

Now let’s try to fetch players, who don’t play for MI.

--Query to fetch who don't play for MI
Select * from Player_Team where (Team<>'MI')

Here is the output:

image

In our table, out of 7, 3 players play for MI so this query should fetch the other 4 players. But it returns only 2 rows, because again for ‘Kaif’ and ‘Arun Lal’ (team value is NULL), expression Team<>’MI’ will be evaluated as UNKNOWN - and again they will be rejected.

To correct this query we need to use ‘is null’ predicate as shown in the below query:

--Query to fetch who don't play for MI -- Correct Approach
Select * from Player_Team where (Team<>'MI') or Team is null

And here is the correct expected output:

SQL Queries

The counterpart of “Is Null” predicate is “Is not null”. So from next time, whenever you have some NULL values in your table, make sure to include proper predicates in queries to handle them.

So we learnt that SQL query filters accepts TRUE but that's not all. Surprisingly SQL check constraints rejects FALSE (accept TRUE and UNKNOWN). Read here an excellent post explaining it.

Last but not the least, here is another twist for you. An expression comparing two NULLs (NULL = NULL) evaluates to UNKNOWN. But for grouping and sorting purposes, two NULLs are considered equal.

Conclusion

This article demonstrates the 3 valued-logic in SQL and how to write queries to accommodate its effect. Hope you guys enjoyed this article!

Ankit primarily works on SQL Server reporting services and sometimes even on ASP.NET AJAX and jQuery. An ardent C programmer, Bollywood movie buff and self-proclaimed singer, Ankit love to listen, read and even speak about various Microsoft technologies. Follow him on twitter @ankitwww

Compressed Tables and Indexes in SQL Server 2008

In this article, we will see how to use the new feature of compressing Tables and Indexes in SQL Server 2008 with some examples. The Compressed Tables and Indexes feature is newly introduced in SQL Server 2008. Creating compressed tables and indexes feature is available only in ‘SQL Server Developer and Enterprise’ editions.

Compression is now supported on ‘ROW and PAGE’ for tables and indexes. Data compression can be applied to a table, which is stored as a ‘HEAP’ or as a ‘Clustered Index’, as well as  non-clustered index and indexed view. Data compression can also be applied to partitioned tables and indexes.

To determine how compression will affect the table or index, we can use a stored procedure

 ‘sp_estimate_data_compression_savings’.

This stored procedure takes the following parameters –
  • Schema Name
  • Object Name
  • Index ID
  • Partition No
  • Data compression
Let’s see an example of this stored procedure on our table, which is just a copy of the ‘Order Details’ table from Northwind. If you have not created this table, create the table first and try the following example –

USE Northwind
GO

EXEC sp_estimate_data_compression_savings 'dbo', 'NewOrderDetails', NULL, NULL, 'ROW'

The result is shown below –

clip_image001[4]

If you check the result, it shows you the current size of the table and requested compression size.

Now let’s see how to compress the above table with the following code –

ALTER TABLE NewOrderDetails REBUILD WITH (DATA_COMPRESSION = ROW)

Now let’s rerun the stored procedure ‘sp_estimate_data_compression_savings’ and check the status –

clip_image001[6]

Cool! Let’s see some more examples of compressing tables and indexes.

Create Table with ROW option

SQL Server 2008 Compression

Create Table with PAGE option -

SQL Server 2008 Compression

Now let’s see how to compress indexes.

Create Index with ROW option

CREATE NONCLUSTERED INDEX Idx_CustomerDispatchDetails
    ON  CustomerDispatchDetails(City)
WITH ( DATA_COMPRESSION = ROW )


Create Index with PAGE option

CREATE NONCLUSTERED INDEX Idx_CustomerDispatchDetails
    ON  CustomerDispatchDetails(City)
WITH ( DATA_COMPRESSION = PAGE )


You can change the compression of an index with ‘ALTER INDEX’ statement –

ALTER INDEX Idx_CustomerDispatchDetails
    ON  CustomerDispatchDetails
REBUILD WITH ( DATA_COMPRESSION = ROW )

 Now let’s create a database as shown below -

CREATE DATABASE SampleDatabase
ON  PRIMARY
( NAME = SampleDatabasePK,
    FILENAME = 'C:\Program Files\Microsoft SQL Server\MSSQL10.MSSQLSERVER\MSSQL\Data\SampleDB.mdf'),
FILEGROUP FG1
( NAME = sampleDBFile1,
    FILENAME = 'C:\Program Files\Microsoft SQL Server\MSSQL10.MSSQLSERVER\MSSQL\Data\sampleDBFile1.mdf'),
FILEGROUP FG2
( NAME = sampleDBFile2,
    FILENAME = 'C:\Program Files\Microsoft SQL Server\MSSQL10.MSSQLSERVER\MSSQL\Data\sampleDBFile2.ndf'),
FILEGROUP FG3
( NAME = sampleDBFile3,
    FILENAME = 'C:\Program Files\Microsoft SQL Server\MSSQL10.MSSQLSERVER\MSSQL\Data\sampleDBFile3.ndf'),
FILEGROUP FG4
( NAME = sampleDBFile4,
    FILENAME = 'C:\Program Files\Microsoft SQL Server\MSSQL10.MSSQLSERVER\MSSQL\Data\sampleDBFile4.ndf')
GO


Partitioned Table with Compressed Partitions

Create a Partitioned table and create compressed partitions in it. First create a partition function as shown below –

image

Now create a partition scheme based on partition function

image

Finally create a table with compressed partitions as shown below –

CREATE TABLE ProductReleaseYear
(ProductID int, ProductName varchar(100),ReleaseYear INT CONSTRAINT UK1 UNIQUE)
ON ProductReleasePS (ReleaseYear)
WITH
(
  DATA_COMPRESSION = ROW ON PARTITIONS (1),
  DATA_COMPRESSION = PAGE ON PARTITIONS (2 TO 4)
)


You may also want to read Backup Compression in SQL Server 2008 and Reduce the Size of a Non-Clustered Index in SQL Server 2008

SQL Server: XML FLOWR Expression in SQL Server 2005 and 2008

In this article, we will see how to use FLWOR Expression designed for querying XML data in SQL Server 2005 and 2008.

In my previous article – ‘XML Basics in SQL Server 2005 and 2008’, we have seen how to perform basic XML operations in SQL Server 2005 and 2008. Now let’s see how to perform some advanced queries for fetching XML data using FLWOR expression. FLWOR stands for –
  • For loop.
  • Let clause. (note that this was not supported in SQL Server 2005. But now it is supported in SQL Server 2008.
  • Where condition.
  • Order by clause.
  • Return.
With a FLWOR expression, we have a couple of functions which we will be using for querying the XML data as below –
  1. query()
  2. value()
  3. exist()
  4. modify()
So now let’s start by writing queries to use the above functions. I have already demonstrated how to insert XML data with schema in my previous article. I will be using the same table ‘CustomerProducts’.
Let’s query the table first –

SELECT * FROM CustomerProducts

Now first query the XML in the column using XPath –

SELECT CustomerProduct.query('
declare default element namespace "http://www.microsoft.com/schemas/northwind/products";
/Product/ProductName')
FROM CustomerProducts


The output is shown below –

image

The second query will fetch just the value from the XML –

SELECT CustomerProduct.value('
    declare default element namespace "http://www.microsoft.com/schemas/northwind/products";
    (/Product/UnitPrice)[1]',
    'varchar(250)')
FROM CustomerProducts


The output is shown below –

clip_image001

Let’s rewrite the above query with a condition. The condition will be to fetch all unit prices whose value is greater than 15.

image

The output will remain the same as shown above.

Now insert some data to do a bit more advanced queries. I have inserted two more products having product ID 2 and 3, product name ABC and XYZ and Unit price 13 and 29.

Now rerun the above query and you will see the following output –

clip_image001[4]

If you observe the above output, it returns ‘NULL’ value whenever the condition is not true. In our case, we have one product’s unit price as 13 which is less than 15.

So let’s try to eliminate the ‘NULL’ values from our result. There are multiple ways of eliminating ‘NULL’ values. Let’s see a  few of them. Write the following query –

SELECT CustomerProduct.value('
    declare default element namespace "http://www.microsoft.com/schemas/northwind/products";
    (/Product/UnitPrice)[1][.>15]',
    'varchar(250)')
FROM CustomerProducts
WHERE
CustomerProduct.value('
    declare default element namespace "http://www.microsoft.com/schemas/northwind/products";
    (/Product/UnitPrice)[1]','int')>15


The output is shown below –

clip_image001[6]

Now try another query which shows one more way to eliminate the ‘NULL’ values from the result, by using an EXIST() function –

image

The output will be same as shown above.

You can also use a subquery to eliminate the ‘NULL’ values as shown below –

image

The output will be same as shown above.

Use XML FLOWR in Nested XML Elements

We will see how to use the FLOWR expression in nested XML. Create a table which will have two columns as shown below –

CREATE TABLE CustomerOrders
(
    CustomerID INT PRIMARY KEY,
    CustomerOrderDetails XML
)


Insert the following row in the table we just created –

INSERT INTO CustomerOrders VALUES
(1,'
<Customer>
    <CustomerID>1200</CustomerID>
    <CustomerName>
        <FirstName>Pravinkumar</FirstName>
        <LastName>D.</LastName>
    </CustomerName>
    <Order>
        <OrderID>2332</OrderID>
        <OrderDate>12/Jun/2010</OrderDate>
        <ProductName>ABCD</ProductName>
        <Quantity>40</Quantity>
    </Order>   
    <Order>
        <OrderID>2432</OrderID>
        <OrderDate>12/Jun/2010</OrderDate>
        <ProductName>MAMO</ProductName>
        <Quantity>20</Quantity>
    </Order>   
</Customer>
')


If you observe the XML shown above, it is having deep nesting of XML elements. Let’s start querying the above XML using FLWOR Expression.

First we will simply return all the products purchased by Customer 1. The query is as shown below –

SELECT CustomerID, CustomerOrderDetails.query('
    for $customer in /Customer/Order
    return $customer/ProductName
    ')
FROM CustomerOrders WHERE CustomerID=1


The output is shown below –

clip_image001[8]

In the above query, we are using the FOR and Return statement of FLWOR expression. Now let’s modify the above query with the WHERE condition as shown below –

SELECT CustomerID, CustomerOrderDetails.query('
    for $customer in /Customer/Order
    where data($customer/Quantity) > 25
    return $customer/ProductName
    ')
FROM CustomerOrders WHERE CustomerID=1


The output is as shown below –

clip_image001[10]

Now write a query to transform the XML as shown below –

image

The output is shown below –

clip_image001[12]

Here’s an OrderBy clause from FLWOR expression –

image

The output is shown below –

clip_image001[14]

Now let’s try an example of the ‘Let’ clause from FLWOR expression –
image

The output is shown below –

clip_image002

Use the modify() function to update the value of XML as well as delete the value of XML as shown below –

UPDATE CustomerProducts SET CustomerProduct.modify('declare default element namespace "http://www.microsoft.com/schemas/northwind/products"; replace value of (Product/UnitsInStock)[1]
    with 10') WHERE CustomerID=1000


Finally, try deleting the ‘LastName’ element from the CustomerOrders as shown below –

UPDATE CustomerOrders SET customerorderdetails.modify('delete (/Customer/CustomerName/LastName)') WHERE CustomerID=1